I’ve long been interested in using game engines as tool for visualising and analyzing geographic information. A couple of years ago I played with Unity. I liked how well integrated with C# it was and how easy it was to create a web application, but I also struggled with seemingly simple things like clicking on lines.
More recently I have taken a look at the other big game engine, Unreal Engine. I now do most of my point cloud related programming in C++ and Unreal Engine has a powerful point cloud engine, so this seems like a natural match for what I want to do. But once again it is relatively difficult to figure out simple things like loading point clouds and drawing lines from code. It doesn’t help that most tutorials (naturally) aim at game development and pre-defined environments instead of loading and building geometry at runtime.
I then encountered Godot in an article about open source game engines. It’s a 100MB download for a single executable that contains everything, including the development environment, compared to the >40GB that Unreal Engine takes up on your disc. It is well documented, and has a large library of 2D and 3D example projects that showcase various capabilities. I find with such complex subjects that it usually works best to find an example that is close to what you want to achieve and then modify it according to your needs.
Luckily, in Godot it’s quite easy to construct geometry from code. Godot has it’s own scripting language called GDScript that has a Python-like syntax. C# is also supported (if you get the .Net version), but not for Web projects. C++ code can be added through GDExtension.
My first attempt was to create a clickable sphere. Being clickable means that the sphere needs to be a Physical Object, and that it needs geometry both for visualisation and collision detection. Here’s the code for achieving that:
func draw_sphere(pos:Vector3,radius:float,color:Color):
    var sphere := MeshInstance3D.new()

    var sphere_mesh := SphereMesh.new()
    sphere_mesh.radius = radius
    sphere_mesh.height = radius * 2.0
    sphere.mesh = sphere_mesh

    var material := StandardMaterial3D.new()
    material.shading_mode = BaseMaterial3D.SHADING_MODE_UNSHADED
    material.albedo_color = color
    sphere.set_surface_override_material(0, material)

    _drawn_nodes.push_back(sphere)

    var collision := CollisionShape3D.new()
    collision.shape = SphereShape3D.new()
    collision.shape.set_radius(radius)

    var body := StaticBody3D.new()
    body.add_child(sphere)
    body.add_child(collision)

    var script := load("res://click.gd")
    body.set_script(script)

    body.transform.origin=pos
    add_child(body)
This code does the following:
- Create the mesh for a sphere. This is the geometry that will be visible.
- Create the collider shape, another sphere.
- Add both the mesh and collider to a StaticBody3D. This is one of the Godot objects that supports a collider. It is unaffected by physics and hence will stay in place.
- Add the script that provides functionality.
- Set the position and and add the body.
Here’s the full code for the click.gd script:
extends StaticBody3D

const MOUSE_DELTA_COEFFICIENT = 0.01
const CAMERA_DISTANCE_COEFFICIENT = 0.2

var _picked := false
var _last_mouse_pos := Vector2.ZERO
var _mouse_pos := Vector2.ZERO

func _ready() -> void:
    input_ray_pickable = true


func _input(event: InputEvent) -> void:
    if event is InputEventMouseButton:
        if not event.pressed and event.button_index == MOUSE_BUTTON_LEFT:
            _picked = false

    if event is InputEventMouseMotion:
        _mouse_pos = event.position


func _input_event(_camera: Camera3D, event: InputEvent, _position: Vector3, _normal: Vector3, _shape_idx: int) -> void:
    if event is InputEventMouseButton:
        if event.pressed and event.button_index == MOUSE_BUTTON_LEFT:
            _picked = true
            _mouse_pos = event.position
            _last_mouse_pos = _mouse_pos


func _physics_process(delta: float) -> void:
    if _picked:
        print(position,global_position)
        _picked=false
This was taken from a Godot example so it has some extra code that isn’t required. The important stuff is the _input_event function that gets triggered when the object is clicked, and the _physics_process function where the position of the object is printed (you could of course do useful stuff with it, like displaying it in a GUI element or using it for calculating distances etc.). This is not done inside the input event as the Godot documentation strongly suggests to do this inside the physics function.
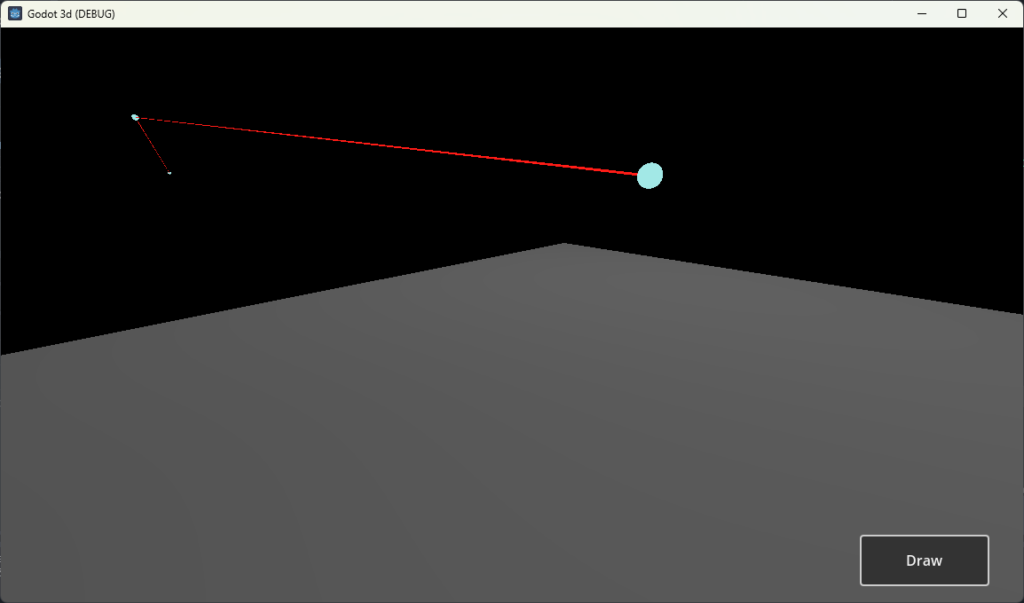
My second attempt was to then draw a line between two points. I first tried this with a mesh, which worked fine, but I could not find a way to make this clickable as I had no way of assigning a collider shape. So I resorted to creating a properly oriented box instead:
func draw_line_segment(pos1:Vector3,pos2:Vector3,size:float,color:Color):
    var segment := MeshInstance3D.new()

    var segment_mesh := BoxMesh.new()
    segment_mesh.size=Vector3(size,size,pos1.distance_to(pos2))
    segment.mesh = segment_mesh

    var material := StandardMaterial3D.new()
    material.shading_mode = BaseMaterial3D.SHADING_MODE_UNSHADED
    material.albedo_color = color
    segment.set_surface_override_material(0, material)

    _drawn_nodes.push_back(segment)

    var collision := CollisionShape3D.new()
    collision.shape = BoxShape3D.new()
    collision.shape.size=Vector3(size,size,pos1.distance_to(pos2))

    var body := StaticBody3D.new()
    body.add_child(segment)
    body.add_child(collision)

    var script := load("res://click_line.gd")
    body.set_script(script)

    body.transform.origin=(pos1+pos2)/2
    var target_vector = pos1.direction_to(pos2)
    var target_basis= Basis.looking_at(target_vector)
    body.basis=target_basis
    add_child(body)
This is generally similar to the code that creates a sphere:
- Create the visualization geometry of a given size in x and y direction and the distance between the two end points in z direction.
- Create the collider geometry.
- Add both to a Static3DBody and assign a script for functionality.
- Properly place and orient the resulting object by setting the position to halfway between the two points and rotating it along the vector from start point to end point.
It’s also easy to get the position of a click on the object instead of the object centre. This is provided by the _position variable in the _input_event function shown above.
I really like about Godot how easy it is to create a user interface. You simply arrange it in the 2D editor. Godot uses a signal system for triggering events, a concept that I’ve liked ever since first encountering it when I started to use Qt almost 25 years ago.You simply hook up signals to functions inside the Godot editor.
These are just the first steps. My plan is to work incrementally from here, adding functionality bit by bit:
- Loading lines in the .poly format that I also use for displaying lines in CloudCompare.
- Loading and displaying point clouds. Ideally in LAZ (which will require use of GDextension to use C++), but I’ll start with ASCII.
- Use drag & drop for loading files.
- Dealing with large coordinates, as Godot by default uses 32-bit floating point coordinates, which limits the available range.
- Loading 3D geometry from files at runtime.
- Doing useful stuff like querying objects, measuring distances, and eventually using it as graphical interface for algorithms like rail extraction.

