The difference between consumer and enterprise network hardware are expanded functionality that aims at more security (such as more advanced firewalls, the possibility to compartmentalize your networks using VLANs and multiple WLAN IDs, and VPNs) and centralized administration. No-one wants to configure multiple (possibly hundreds) of switches and access points manually. Hence everything revolves around one (or multiple) controllers that automatically provide settings for devices and allow for central administration.
Controller
Omada users have four possibilities for running controllers:
- Using a cloud controller.
- Using one of Omada’s hardware controllers, which is essentially a small computer that only runs the controller.
- Using an all-in-one router that integrates the controller. Currently the ER7212PC is the only device that supports this.
- Running the software controller on another device.
As I have an Intel N100 mini PC that runs all the time anyways, it made the most sense to run the software controller on there. The adblocker Pi-Hole runs on there, too.
The controller software can be downloaded here. The installation is explained here. I struggled a bit with the MongoDB installation. The only official release for Ubuntu 24.04 is MongoDB 8, but the Omada controller software requires MongoDB 7. This can be installed by using jammy instead of noble (as I first tried) as installation source, i.e. by using the Ubuntu 22.04 repository.
I did the initial controller setup without any Omada devices in the network, so setup was limited to choosing user name and password, and skipping everything else.
Router
I then hooked up the router (ER7412-M2) to the internet using one of the WAN ports, and connected the mini PC and another computer to LAN ports. The default settings for the router are DHCP on the WAN port and providing IP addresses in the 192.168.0.xxx range for LAN devices, starting at 192.168.0.100. Knowing this I could easily connect to the controller interface on my headless mini PC from the second computer.
After a few seconds, the router was detected by the controller and could be adopted. After that I could change settings. The first thing that I recommend is setting a static IP address for the controller, which can be done from the clients page.
WAN
You can configure multiple ports as WAN ports. Settings are made on the Wired Networks – Internet page by clicking on the Edit action. Here you can set the connection type. With my ISP, I also needed to set a VLAN Id and check the „802.1Q Tag“ checkbox.
WireGuard VPN
WireGuard is quickly becoming the VPN protocol of choice, as it is considerably faster than OpenVPN. In fact, WireGuard support was a must for me. It took me about half an hour to figure out how to set it up, so here’s a short overview:
- In the controller, configure WireGuard. You need to enter a name and the local IP address that this connection will use. I initially chose 192.168.0.10 (later changed to an address in another VLAN), as this in the same subnet but outside of the DHCP range of other devices. The public key needs to be shared with all clients.
- Download the WireGuard software on the client PC and add a new empty tunnel. The following configuration values need to be added:
[Interface]
PrivateKey = xxx
Address = 10.0.0.2/32
DNS = 8.8.8.8

[Peer]
PublicKey = yyy
AllowedIPs = 0.0.0.0/0
Endpoint = 192.168.178.75:51820
- Address is the IP address under which the client will connect to the server.
- PublicKey is the server public key generated above.
- Endpoint is the WAN IP address of the server – as I was testing inside my home network, it’s a 192.168. address. You can change the DNS server address to something different, e.g. a Pi-Hole server.
- Finally, make the client known to the server. This is done under Peers in the controller GUI. Add a name for the client computer, set the allow address to the Address defined above, and enter the client’s public key that is shown in the WireGuard program.
With all of this done, it should be possible to activate the WireGuard tunnel and access devices behind the router. And yes, WireGuard is a peer-to-peer protocol, so you’ll have to add peer entries for each client.
Wireless
Adding and configuring Omada access points is extremely easy. Simply connect them, they will then become visible in the list of unknown devices and can be adopted. After the first access point has been added, wireless networks can be configured. From then on, new access points will automatically use the existing settings after adoption.
It is recommended to turn on OFDMA (which is located under device settings – Advanced) and Airtime Fairness (under Site Settings – Beacon control). You can also turn on Non-Stick Roaming here if you experience issues with mobile devices clinging to a suboptimal AP when moving through the house.
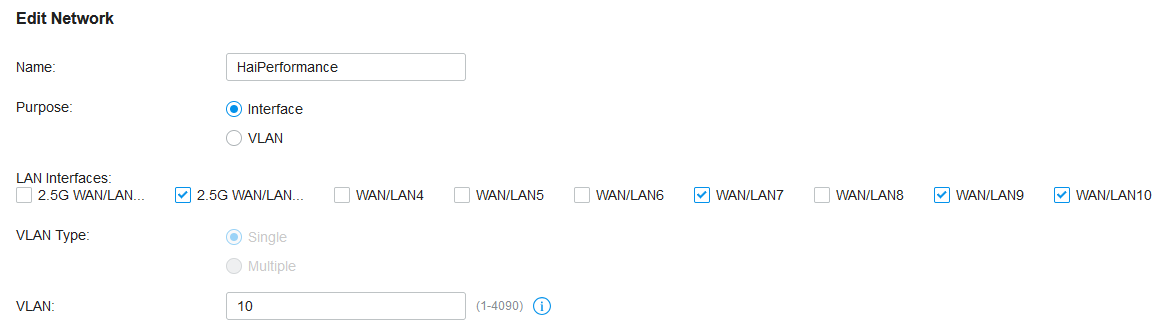
VLAN
VLANs allow separating devices on the same physical network into virtual networks. This makes a lot of sense in a small office/home office situation where there’ll be not only work-related devices, but also other hardware like the kids‘ tablets and phones that you want to prevent from accessing your work network. Another candidate for separation are the many (IoT) devices like WiFi home automation stuff that you might want to restrict from access to the Internet in general.
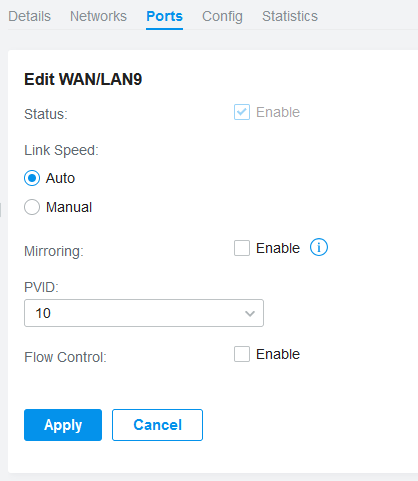
Configuration of VLANs and multiple SSIDs is explained here. Don’t forget to assign all networks to all ports that are connected to an access point, as the access points need to be connected to all VLANs. The same holds for managed switches. The issue I ran into was that devices connected directly to my router would still get an IP address in the default network, even though a VLAN was assigned to their port. Here the solution was to go to the port tab of the router settings (under devices) and assign the proper VLAN PVID.
By default, different VLANs are allowed to access each other. This can be prevented with Access Control Lists (ACLs).
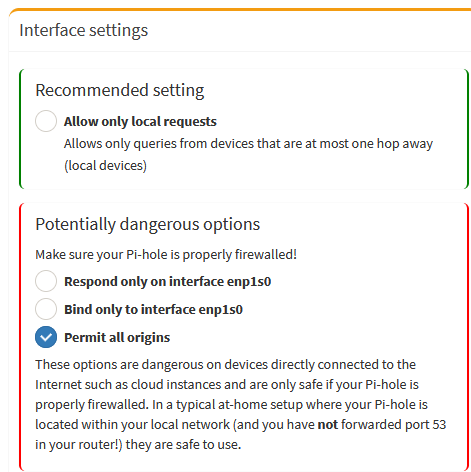
Introducing VLANs does complicate things when accessing a device that’s on another VLAN. Omada now supports mDNS, which is required e.g. to find printers, but I still couldn’t get mDNS-based printing to fully work. I managed however to add and use a printer in a different VLAN by its (fixed) IP address. The other issue that I faced was using Pi-Hole. The default setting of Pi-Hole is to only accept requests that are just a single hop away, which is no longer the case when using VLANs. Allowing all requests solved this.
Switches
I’ve got one managed switch in my setup. I haven’t taken a deep look at the configuration options yet, but setting VLANs to ports works just like with the router ports. VLANs are assigned on the Ports tab that can be reached via Devices.
